Extending Nullsoft Installer to talk to IIS

Talk to IIS from a Nullsoft Installer

A new Nullsoft installer plug-in provides access to IIS during an installation

Summary

An example of how the the Nullsoft installer plug-in, NsisIIS (http://nsis.sourceforge.net/NsisIIS_plug-in) , allows you to read from the IIS metabase when your installer is run.

Manipulating IIS from NSIS

One of the things we use the Nullsoft Installer (aka NSIS) is to deploy IIS based intranet applications. Just recently I’ve found a new IIS plug-in, NsisIIS which allows you to (in the authors words)

“to create/edit/delete/getinfo Microsoft IIS virtual directories and manage it’s service status”

I’ve often wished for just such a plug-in so I was really pleased to find someone had written it for me !

Sample Script

As soon as I saw this it seemed like a great idea. Unfortunately the current release doesn’t include any sample scripts (or it does I can’t find them) so I’ve written one.

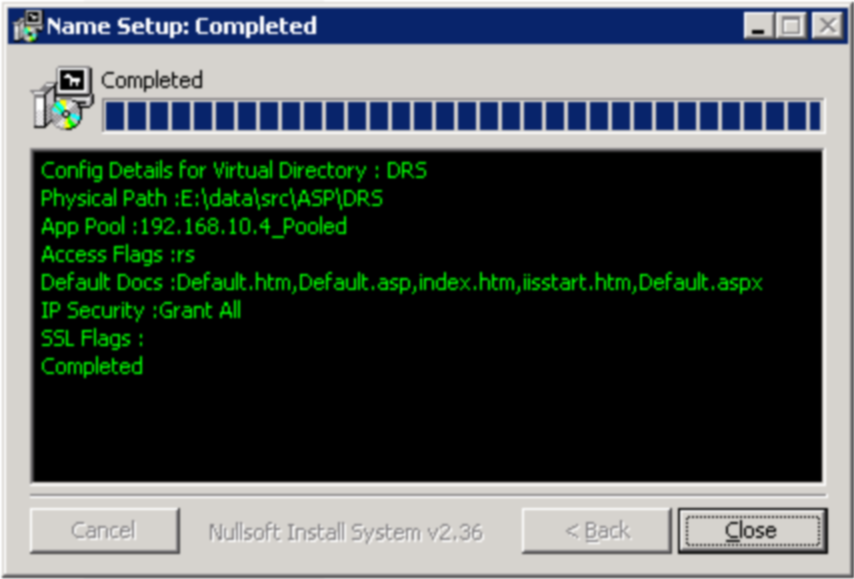
My sample script, NSI_GetVirDirExample.nsi, dumps the details of a hard-coded virtual directory to the details panel of the installer like this :

NsisIIS Example Script

NsisIIS Example Script

The script that produces this output is a very simple NSIS script which looks like this (I’ve also made it available at http://pastie.org/1024393 to help with copy/pasting).

;This Nullsoft Installer System (NSIS) script illustrates
;the use of the NsisIIS plugin at version 1.0.0
;(http://nsis.sourceforge.net/NsisIIS_plug-in)
;
;This script uses a hardcoded virtual directory
;present in the default web site within IIS and
;dumps some configuration details to the NSIS
;details panel

;Output file name
OutFile "NSI_GetVDirExample.exe"
;'Show Details' panel open by default
ShowInstDetails show
section -
 ;variable to contain Virtual Directory name
 Var /GLOBAL vdName
 ;initialise to name of Virtual Directory of Interest
 StrCpy $vdName "DRS"
 ;warn the user what Virtual Directory they're pointing at
 ;because you end up with a very ugly crash if it doesn't exist
 MessageBox MB_OK "You are reviewing the details of Virtual Directory : $vdName ."

 ;call the GetVDir function from the NsisIIS plugin
 ;Registers are updated as follows:
 ;$0 Physical Path
 ;$1 Application Pool
 ;$2 Access Flags
 ;$3 Default Documents in comma delim list
 ;$4 IP Security Details
 ;$5 SSL Details (not working in this release)
 ;
 ;See NsisIIS documentation for more details
 NsisIIS::GetVDir $vdName

 ;dump the Virtual Directory config details from registers
 ;$0 to $5 out the the details panel
 DetailPrint "Config Details for Virtual Directory : $vdName"
 DetailPrint "Physical Path :$0"
 DetailPrint "App Pool :$1"
 DetailPrint "Access Flags :$2"
 DetailPrint "Default Docs :$3"
 DetailPrint "IP Security :$4"
 DetailPrint "SSL Flags :$5"
sectionend

Warnings !

Hardcoded Virtual Directory Name

To use my example script yourself you’ll need to amend the line which initialises the variable containing the virtual directory name, for instance if your virtual directory is called “Accounts” you would need to amend :

 StrCpy $vdName "DRS"

to read

 StrCpy $vdName "Accounts"

Error Handling

There’s no error handling in my example script (as you can see). If you specify a virtual directory that doesn’t exist or that you’re not allowed to access when you run NSI_GetVDirExample.exe it will crash and burn.

Default Web Site

As far as I can tell NsisIIS will only access the default web site. For 95% of IIS users that would be just fine but if you have a virtual directory on a non-default website you’re going to have to wait for a later release

NsisIIS Documentation

To take this any further you’ll want to read the documentation which you can find in a Word For Windows document here.

“Hello World” for Nullsoft Installer

Simplest Possible Example for Nullsoft Installer

A pointer to a “Hello World” script for the Nullsoft Installer

Summary

A pointer to some very simple Nullsoft Installer examples

Getting Started

Our company makes good use of the Nullsoft Installer (aka NSIS) – like most installers it’s not super easy to use but it’s the best I’ve seen for our purposes.

The other day I was introducing another developer to the Nullsoft Installer.

I find it really useful in these situations to have as simple an example as possible to start off from. Within the Nullsoft site there’s a whole set of useful tutorials and one of those is “Simple Tutorials” including one that is as simple a NSIS script as you can possibly have.

If you’re starting out from scratch with NSIS it’s worth reading through as getting started with NSIS can be a bit of a head scratcher !

Right on Date/Time

Date/Time Named Files in DOS Batch

Producing date/time named files for output from DOS Batch

Summary

Good for when you want the output from a .BAT command file to be written to a date/time stamped file.

My Problem

Today I wanted to schedule a job to run on a clients machine several times a day for a number of weeks. Each time it ran I wanted an output file to with a name a bit like this :

DIAG-20100604T120000.txt

I find writing output to files which have their date/time of creation embedded in their names to be so useful it’s something I’m willing to muck around a bit to achieve.

The job i was running was all wrapped up in a .BAT file – how difficult could it be to get a .BAT file to produce a formatted date/time ? Well the answer is sufficiently difficult I side-stepped the problem !

Locale Independent

When I started looking for others who’d formatted date/times in .BAT land I found plenty of that made assumptions about the date/time format present on the machine it was running on but I really dislike using code like that – I’ve been bitten by it too many times in the past .

In the end I decided the only (or at least the easiest) thing to do was to allow a .VBS file to do the actual date/time formatting and allow the .BAT to use that.

First take some VBS

I pulled together a script I called iso.vbs.

The key thing with the VBS is the way the formatted date/time gets used in the last line. We’re going to use that output when we write some .BAT.

function addLeadingZeroIfNess(strIn)
 if len(strIn) < 2 then
 strOut = "0" & strIn
 else
 strOut = strIn
 end if

 addLeadingZeroIfNess = strOut

end function
'++++++++++++++++++++++++++++++++++++++++++++++++++++++++++++++++++++++++
OurDate = Now()
Yr = DatePart("yyyy",OurDate)
Mth = addLeadingZeroIfNess(DatePart("m",OurDate))
Dy = addLeadingZeroIfNess(DatePart("d",OurDate))
Hr = addLeadingZeroIfNess(DatePart("h",OurDate))
Mn = addLeadingZeroIfNess(DatePart("n",OurDate))
Sec = addLeadingZeroIfNess(DatePart("s",OurDate))
ISO = Yr & Mth & Dy & "T" & Hr & Mn & Sec
wscript.echo ISO

Now Add a bit of .BAT

Then I wrote a short .BAT file, iso.bat, which invokes the iso.vbs shown above and then invokes the ‘real’ .BAT which is the one I actually wanted to run, diag.bat

@echo off
for /f "delims=" %%a in ('cscript //nologo iso.vbs') do (set ISODateTime=%%a)
call diag.bat > "DIAG-"%ISODateTime%".txt"

iso.bat uses the formatted date/time  (eg “20100604T120000”) produced by iso.vbs above to assign to the variable %ISODateTime%. The variable is then available to form part of the file name used for the diag.bat output.

A Bit of Context

If the machine I was using had either PowerShell or Python installed Iwould have come at this from a different angle but … it didn’t !

Credit Where Credits Due

A posting by Tom Lavedas in the vistax64 forums put me on the right track for passing the values from VBS to BAT land – for which my thanks.

Nose’ing out Tests

A Quick ‘nose’ tip

Why your unit tests might not be discovered by nose

Using nose for the first time

Out and about herding unit tests the other day I decided to try nose . nose is a unit test framework which provides test discovery and running facilities for python based unit tests. This seemed like what I needed given I had a lot of tests and I’d heard good things about nose.

Trying it Out

Everything went very well. I downloaded and installed – all very easy. Quickly scanned the usage doco and thought it was all good to go. The only problem was when I did

cd /path/to/project
nosetests

nose couldn’t find any of my tests. All very puzzling

A ‘gotcha’ I might save you from

Well I tried lots of stuff but the bottom line here is that I’d fallen prey to not being a regular expression parser … again !  The fact is that nose will, by default, look for files which match the regex

(?:^|[b_./-])[Tt]est

and what I hadn’t noticed was that isn’t going to find files like MyClassTest.py it will find, for instance, MyClass-Test.py but without that hyphen my precious tests were invisible ! Sadly (for me ) everyone of my tests was in a file named like MyClassTest.py !

More Generally

More generally (and courtesy of a post on StackOverflow by Mark Rushakoff I came across) the following file patterns will match the nose default:

  • TestFoo.py
  • Foo-Test.py
  • Foo_Test.py

but as I discovered this will not

  • FooTest.py

Environment

I discovered this whilst working on nose 0.11.3 under Python 2.6 .

VMWare Console Timeouts

VMWare and Timing Out

VMWare and Console Timeouts

Summary

Avoiding the  “Cannot access virtual machine console. The request timed out” message in VMWare Server Console pane

Disclaimer

This explains how to get around a problem it seems a few people have in VMWare Server. I’ve no idea why it helps but it does !

My Problem

Today I’ve been using VMWare Server for the first time. I set up a new Virtual Machine and wanted to boot Ubuntu Server as a VM. The log messages seemed to suggest everything was going well but when I tried to use the Console within the VMWare Server to configure my new guest OS I would get the message “Cannot access virtual machine console. The request timed out” … again … and … again … and … again ! Very frustrating.

I tried a lot of things – read a lot of documentation and then I stumbled on a way around the problem.

Solution

Within the VMWare Server control panel is a link “Generate Virtual Machine Shortcut”. I’m not sure why I did this but I used that option to generate a URL and then loaded the URL into a different browser. The resulting screen looks pretty similar to the VMWare Server control panel I’d been staring at for a while but for some reason when I tried to use the console it just worked !

As I say I don’t know why but I hope it helps someone who’s bashing their head against this.

Environment

For what it’s worth I’m using Vista Ultimate as the host OS, Ubuntu 8.4.4 Server as the guest OS and VMWare Server 2.0.2.

Taking your PIL with py2exe

Letting PIL and py2exe be friends

Escape from “cannot identify image file” hell

Summary

The Python Imaging Library (PIL) provides great image manipulation help for your python programs. Py2exe provides a smart way of turning a python script into a windows executable. There are times however when the resulting .exe will break if you don’t do the right thing.

My Problem

I’d written a Python script, openpilwithdiag.py, which read TIFF files and worked just fine when run through the Python interpreter.

from PIL import Image
im = Image.open("test.TIFF")
print im.getcolors()

I then used py2exe to convert the script to a .exe.  Aargh – when I went to run it I got an error :

IOError: cannot identify image file

It took a little digging around but it seems that when PIL constructs one of its PIL Image objects it searches a set of ‘image plugin’ files within the PIL installation. This is all good except that by the time py2exe has done it’s thing PIL (now nicely wrapped up inside the .exe) will be looking in the wrong place.

The Solution

Pleasantly simple – given all the blind alleys I looked down to start with ! I’d previously had nasty problems using TIFF files with PIL and I think I started looking at this expecting the answer to be really nasty !

Whatever file formats you want to use import the corresponding PIL plugin directly into the script so that the instantiation of Image can ‘see’ them. For my example that’s like this :

from PIL import Image
from PIL import TiffImagePlugin
im = Image.open("test.TIFF")
print im.getcolors()

Tried py2exe again and what do we get ?

C:\>openpilwithdiag.exe
[(37306, (76, 25, 12, 51)), (42810, (0, 0, 0, 255)), (1489484, (0, 0, 0, 0))]

Much better !

Plugin Details

The set of possible plugins may be found by looking for files named xImagePlugin.py (where x is the name of the supported format) within the sub-directory of your Python installation at :

<your python directory>\Lib\site-packages\PIL

A list of file formats PIL supports is seen in the appendix of the PIL Handbook

Postscript

It occurs to me that for anyone who’s never touched py2exe it might be worth posting the setup.py I was using to drive the py2exe process – so here it is :

from distutils.core import setup
import glob
import py2exe

setup(console=['openpilwithdiag.py'],
            data_files=[]
)

Iterating over directories using .BAT

Wildcard Directory Copy in DOS Batch

Moving lots of directories using DOS Batch and wild cards

Summary

This is great for those hideous clean up jobs where you have masses of sub-directories and you want to move a large subset of them somewhere else.

My Problem

I had a directory and it was full of sub-directories looking like this :


2009-12-01 07:33 111-y-888
2009-12-01 07:32 123-x-456
2009-12-01 07:32 123-y-456
2009-12-01 07:32 125-y-456
2009-12-01 07:33 876-x-342
2009-12-01 07:33 999-x-123
...

There were thousands of these things and I only wanted to remove the ones that had an ‘x’ in the middle.

No problem I thought XCopy will do this. Well strange to say but if you want to use wild cards – and clearly I did – XCopy won’t drill down and copy the contents of the director you’re copying. You can use the /E flag and get an empty directory copied but not the actual contents.

Weirdo DOS Batch arguments !

Weirdo DOS Batch arguments to the rescue ! I wrote a one line .BAT file like this :

for /d %%X in (%1) do move %%X %2\%%~nX

I called that movedirs.bat and then to move all the ‘x’ directories from E:\ABC to E:\XYZ I called it like this

movedirs.bat E:\ABC\*x* E:\XYZ

which uses a for loop to process each directory which matches the wildcard individually and uses xcopy on each sub-directory within the for loop.

The gory details

The /d argument on the ‘for’ ensures that only directories are processed. The ‘~n’ modifier on the %%X variable means that the original sub-directory name (as opposed to the entire path) is used as the target within the second command line argument.

So good I wrote it twice

Just to be up front this post is based on a stackoverflow question I posed and then answered myself. It seemed too useful to just be there so I recycled it for my blog.

Hex to Decimal Conversion in .NET

Hex to Decimal in C#

Two alternate ways of converting a hex string to decimal

Summary

The other day I needed to write some code to convert an integer expressed in hexadecimal to decimal. I was surprised to find that the way to do it wasn’t the way I expected.

The value I was processing had come from a different environment and had a ‘0x’ prefix to define its base – it was also a string. I just assumed i could feed this to int.Parse and I’d get the answer I was after.

In fact it seems that you either have to get rid of the ‘0x’ prefix or find some other way of doing it. I write a little program to illustrate the choices.

AllowHexSpecifier Weirdness

One thing to notice here which is really quite strange is that the int.Parse option takes an enumerated type argument System.Globalization.NumberStyles.AllowHexSpecifier when in fact it doesn’t allow a Hex specifier ! I’m sure there’s some sense to that but I don’t see it myself !

Example Code

using System;
using System.Collections.Generic;
using System.Text;
using System.Globalization;

namespace HexParsing
{
    class Program
    {
        static void Main()
        {
            string strTestHex ;
            int iTestHex;
            string sOut;
            string s1 = "{0} converted to base 10 using int.Parse is {1}";
            string s2 = "{0} converted to base 10 using Convert.ToInt32 is {1}";

            //Without a prefix - using int.Parse
            strTestHex = "7FC3DAE0";
            iTestHex = int.Parse(   strTestHex,
                                    System.Globalization.NumberStyles.AllowHexSpecifier,
                                    CultureInfo.CurrentCulture);
            sOut = String.Format(CultureInfo.CurrentCulture, s1, strTestHex, iTestHex);
            Console.WriteLine(sOut);

            //With a prefix - using Convert.ToInt32
            strTestHex = "0x7FC3DAE0";
            iTestHex = Convert.ToInt32(strTestHex,16);
            sOut = String.Format(CultureInfo.CurrentCulture, s2, strTestHex, iTestHex);
            Console.WriteLine(sOut);

            Console.WriteLine("Press ENTER to close window");
            Console.ReadLine();

        }
    }
}

Sphinx Documentation Generator – Tutorial 2

Sphinx – first project output

A series of tutorials on using the Sphinx Documentation system aimed at absolute beginners.

Summary

In this second part of my Sphinx Tutorial we use the ‘quickstart’ script provided with Sphinx to quickly produce a basic set of documentation source files.

Our First Sphinx Project

Sphinx has a great way to get you started and that’s the ‘quickstart’ script (you’ll find sphinx-quickstart-script.py in the Scripts directory of your Python installation). Quickstart walks you through a series of questions to produce a basic set of the files you’ll need to produce your documentation.

Quickstart is pretty easy to use and even more so when your aim is to produce something very basic (which is the aim of this tutorial).

We’ll just step through the more important bits here :

Specify where you want the Documentation to be created

Sphinx is going to create some files and a few directories so choose where you want those to be created :
Enter the root path for documentation.
> Root path for the documentation [.]: C:\data\src\Sphinx\Test1

Specify a name for the Documentation:

What ever name you choose will appear in various places in the documentation so choose something you’re happy with

The project name will occur in several places in the built documentation.
> Project name: Sphinx Tutorial
> Author name(s): Richard Shea

Specify a version for the Documentation:

Similarly you’ll get the version number appearing in various parts of the output documenation

> Project version: 1.0.0

Specify if you want any clever stuff:

Sphinx is able to do all sorts of clever stuff apart from interpreting your RST files into beautiful output. We don’t want any of that for the first part of the tutorial so say ‘no’ to all of this.

Please indicate if you want to use one of the following Sphinx extensions:
> autodoc: automatically insert docstrings from modules (y/N) [n]:
> doctest: automatically test code snippets in doctest blocks (y/N) [n]:
> intersphinx: link between Sphinx documentation of different projects (y/N) [n]:
> todo: write "todo" entries that can be shown or hidden on build (y/N) [n]:
> coverage: checks for documentation coverage (y/N) [n]:
> pngmath: include math, rendered as PNG images (y/N) [n]:
> jsmath: include math, rendered in the browser by JSMath (y/N) [n]:
> ifconfig: conditional inclusion of content based on config values (y/N) [n]:

Make it easy on yourself (at least to start with)

It’s perfectly reasonable to use build the Sphinx output by providing your own command line options but to get started with it’s helpful to allow Sphinx to help a little so say ‘yes’ to a .BAT or a makefile (depending on what’s your choice of poison).

A Makefile and a Windows command file can be generated for you so that you
only have to run e.g. `make html' instead of invoking sphinx-build
directly.
> Create Makefile? (Y/n) [y]:
> Create Windows command file? (Y/n) [y]:

The results of quickstart

So after all that what have we got ? Well we specified C:\data\src\Sphinx\Test1 as the output path and if we look in there we find we’ve got a build and a source directory (as well as the Makefile and make.bat we asked for). What we’re interested in to start with is source\index.rst.

Open it up in a text editor and you’ll see it looks like this :
.. Sphinx Tutorial documentation master file, created by
sphinx-quickstart on Sun Nov 1 18:08:19 2009.
You can adapt this file completely to your liking, but it should at least
contain the root `toctree` directive.

Welcome to Sphinx Tutorial's documentation!
===========================================

Contents:

.. toctree::
:maxdepth: 2

Indices and tables
==================

* :ref:`genindex`
* :ref:`modindex`
* :ref:`search`

Next Steps

In the next part of this series, Sphinx – Absolute Beginners – Part 3, we’ll see how to make this file into either HTML or PDF output. In later parts of the series we’ll see how to use your existing Python code comments to produce automated documentation of your Python code.

Sphinx Documentation Generator – Tutorial 1

Sphinx – Absolute Beginners – Part 1

A series of tutorials on using the Sphinx Documentation system aimed at absolute beginners

Summary

Sphinx is a great tool that makes it easy to create good looking documentation in a range of output formats. If you’re a Python programmer it also makes it easy to use your existing docstring comments to form the basis of your documentation.

I’ve found using Sphinx for the first time a little difficult as much of the documentation seems to assume you know certain things. This series of posts provides a tutorial for the absolute beginner.

Ground Rules (for impatient programmers)

Now at this stage there’s a couple of things that are well worth knowing !

  • Sphinx is good at auto-documenting Python code but that’s not its primary role. If you’re a Python programmer looking to auto-document your code it takes a while to understand that a lot of the facilities in Sphinx are nothing to do with what you’re after and that can be confusing.
  • In Sphinx-land ‘the source files’ refer to the documentation configuration files. This confused me for a while whenever the term ‘source files’ was used I thought it meant my python source files.

Getting Spinx Installed

The prerequisites part of the Sphinx doco does a good job here but in summary:

  • You want to have installed Python 2.4 or better
  • Grab the source from the Sphinx Python Project Page or …
  • … just use easy_install -U Sphinx

Next Steps

Sphinx has a great way to get you started and that’s the ‘quickstart’ script. In the next part of this tutorial series we’ll cover how to quickly and easily produce your first Sphinx project.